I wasn't expecting to knit another full-sized Aeolian, let alone another in the same colour as my very first one... but then I found myself participating in an impromptu craft exchange. So, at the end of a few weeks of knitting (and what feels like several million nupps) I found myself with Aeolian No. 4 off the needles and needing blocking.
As I haven't actually seen any instructions online on how to block an Aeolian for maximum symmetry and minimum effort (I have no doubt that such instructions are actually out there, but I haven't gone looking for them), and as the recipient of this shawl is not a knitter and was interested in the process, I created a little photo record of the exercise.
The main point to note -- which I neglected to take into account when blocking my own first Aeolian -- is that this shawl doesn't have a single straight edge in it and even the central spine actually curves in the third dimension. As a result, the shawl will actually refuse to lie completely flat, and if one tries to block it as though it could lie flat, there will be distortion in the edge motif with some of the flowers being cramped and others over-stretched. After mishandling the blocking of my first shawl (which I'm planning to soak and re-block correctly as soon as I can find the time), I blocked my subsequent models by folding them over along the central spine. As a result, the shawl looks like nothing remotely resembling a wearable shape while it's pinned out, but once it's dry and unpinned, it has its proper, lovely, wing-like shape, drapes beautifully over the shoulders when worn, and tends to stay in place without needing shawl pins because the long edge curves gently forward on both sides rather than being a straight line.
Anyway, here goes.
Amoeba!

Bath time:
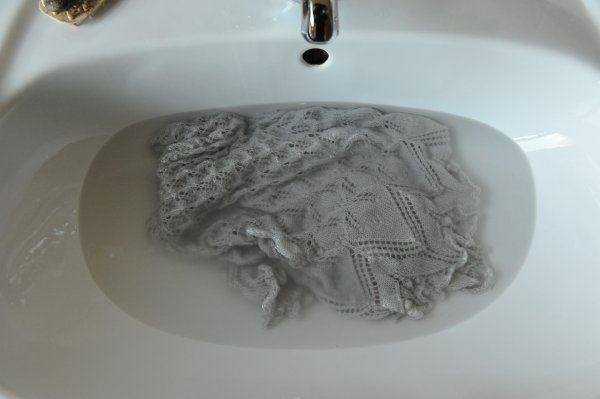
(I was planning to soak it for half an hour or so, just to make sure the yarn was well saturated. I then got distracted by the Internet and it stayed in the water for a whole hour. I don't think it minded.)
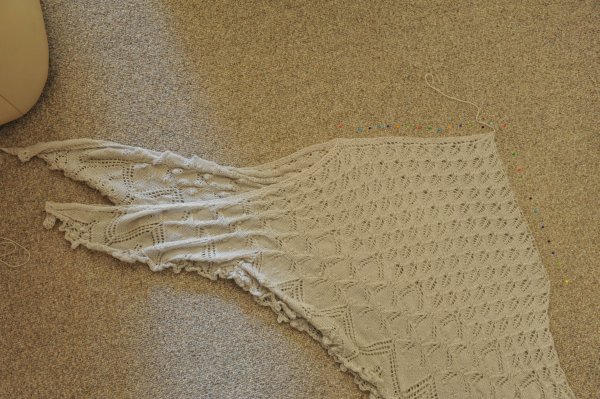
Ready to be pulled into shape after being rolled up in a towel and gently squeezed to get most of the excess moisture out:

Getting started:
 I do this freehand, because there's no point working with a straight edge when the piece I'm blocking has no straight edges, so the first pins that go in are subject to a lot of repositioning and tweaking as the work progresses. The long edge of the shawl is on the left in this shot (look at the unpinned section and you can see it's two thicknesses of fabric on top of each other). The right edge is the central spine. I put a played-out guitar string -- carbon fibre or nylon, NOT metal-wound! -- down the spine to make blocking easier and require fewer pins at that edge.
Here it is at this stage from a different angle:
More of the final shape roughed out in this next shot. You can also see the yarn tails, which one does not weave in before blocking unless one's actually trying to make a mess of the finishing:
 The shape of the long side isn't right yet and will be fixed down the line. The central points of a few of the flowers have been pinned out just to see whether the dimensions are basically right and nothing's been overstretched during blocking so far.
Getting started on the detail of the flowers now:

There are about twice or three times as many pins in the long side now, to prevent involuntary scalloping as the tension on the edges increases:

Mostly done now (shape of long side still needs some cleaning up):

And here, after much crawling around on the floor, it's all done at last and ready to dry overnight under the watchful eye of Leppy the plush leopard, who promised to make sure nobody interfered with the pins while the shawl dried:

Fast-forward to today. Leppy was as good as his word, and once the pins were removed, the piece looked like this:

...and after being unfolded and laid out to show off its full size, it looked like this:

Here's a detail of the stitch patterns:

And here, because it's a sunny day and I had a photographer available, are a few modelled action shots.
Back view:

Front(ish) view. Because of the shape of the shawl, it stays on amazingly well if you just flip each end over the opposite shoulder. Unless you're being quite active and moving around and bending/straightening up a lot, it'll pretty much stay put without needing a shawl pin to keep it in place:

And here it is spread out in all its glory:

